
Motorbike GPS Windshield Mount
Occasionally we get presented with a unique challenge. Our customer Andrew contacted us looking for a way to improve the existing GPS Mount on his Harley Davidson. Having recently purchased his new bike Andrew rode from NSW to Adelaide. This journey allowed him to test out his new bike and its navigation system. To help with navigation, Andrew clamped a Garmin GPS to its handlebars. This presented two issues. Firstly, the mounting location provided a sub-optimal viewing angle being located to the left and below the handlebars. Andrew found it challenging to view the GPS screen when riding. Furthermore, the screen vibration at idle and at speed made it difficult to read.
Improving upon the existing GPS Mount
 Upon arriving in Adeliade Andrew contacted us as he was looking for help with the above issues. We commenced by looking at how we could improve the existing setup. Clamped to the handlebars was a RAM Mounts plate with a 1″ ball at the bottom of the plate. Subsequently, this positioned the GPS next to the left-hand grip and below the handlebars. After pulling apart the existing mount we came up with an initial solution that would improve the viewing angle. Upon creating the first prototype we realised this provided only a modest improvement to the viewing angle. Unfortunately, it didn’t resolve the issue of screen vibration. After exploring various options, we arrived at a compromise we thought would work. That was until Andrew expressed his concern about eliminating screen vibration.
The Motorbike GPS Windshield Mount was born
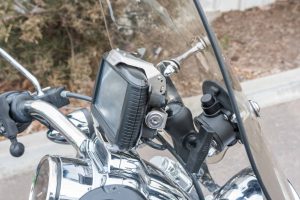
 Harley Davidson motorcycles are renowned for producing excessive vibration from their engines. We quickly realised it was almost impossible to fix this vibration issue mounting a GPS towards the end of the bike’s handlebars. It was at this point, we pulled out a trusty SeaSucker 114mm Vacuum Mount and attached it to the inside of the windshield of Andrew’s Harley Davidson. Subsequently, we had a mounting platform upon which we could build a custom GPS Mount. We also knew from previous experience, using the RAM Mounts 1″ ball and arm would not be sufficient to reduce this level of screen vibration. Subsequently, we built a mounting system using the RAM Mounts 1.5″ ball and arm.
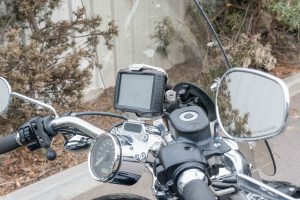
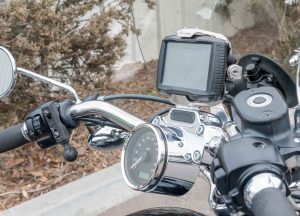 The first test fit produced a surprising result. We could not only attach a SeaSucker 114mm Vacuum Mount to the inside of the windshield but it enabled us to position the Gramin GPS directly above the centre of the handlebars providing the perfect viewing location and angle. We asked Andrew to test ride the new prototype. Within 15 minutes Andrew returned with the news that the new mounting location had exceeded his expectations. Andrew did, however, report that whilst riding the screen didn’t vibrate but there was some vibration at idle. As a result, we lowered the GPS so that the mount was in direct contact with the handlebars. To prevent scratching the handlebars as a result of two metal surfaces making contact we installed a small strip of “Hook and Loop” Velcro between the GPS Mount and the handlebars. This eliminated screen vibration both at idle and at speed. As a result, the Motorbike GPS Windshield Mount was born.
A closer look at our new prototype Motorbike GPS Windshield Mount
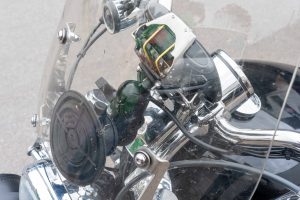
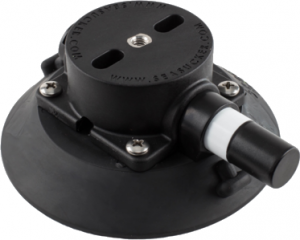 At the heart of this new GPS Mount is the SeaSucker 114 mm Black Vacuum Mount. Armed with 45 kg of direct pull strength and an 18 kg safe weight carrying capacity the SeaSucker 114 mm Black Vacuum Mount was certainly up to the task. Furthermore, this vacuum mount is extremely good at absorbing vibrations. The vacuum pad is made of UV stabilised rubber, once a seal is created the vacuum pad compresses down as the air is sucked out. As a result, the vacuum mount becomes a great platform upon which we can mount almost anything. A key component of the vacuum mount is the circular housing bolted to the vacuum pad using four screws. It’s the housing that provides the integration point between the vacuum mount and the device you wish to attach it to.
We screwed a RAM Mounts 1.5″ ball with a Round Base with a 1/4-20 thread. to the SeaSucker 114 mm Black Vacuum Mount. The thread screws into the centre thread of the vacuum mount housing. As a result, this provides a strong connection between the 1.5″ ball and the vacuum mount housing. To ensure it won’t come loose we lined up one of the holes in the base with the slots on the housing and inserted a 10/32″ screw. This ensures the RAM Mounts base remains secured to the vacuum mount and can’t come undone. Attached to the 1.5″ ball is a RAM Mounts Short Double Socket Arm for 1.5″ balls. And finally, we used a RAM Mounts 1.5″ Ball with Diamond Plate to attach to the GPS Mount.
If you are interested in this product please contact us on 1300 877 119 or via email: sales@seasucker.com.au