How to install a SeaSucker Bike Rack
How to install a SeaSucker Bike Rack
Not sure how to install a SeaSucker bike rack? The video below provides an excellent step by step guide. Furthermore, we documented each step into a useful guide directly below this video.
Video key points on how to install a SeaSucker Bike Rack
Where to install a SeaSucker Bike Rack

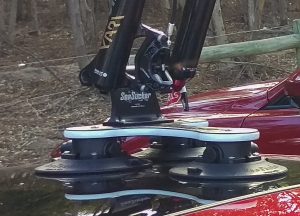
Whilst this isn’t covered explicitly in this video there are several things to note. The Talon bike rack mounting location used in this video is ideal due to its high strength and rigidity. The front windscreen is an ideal surface for mounting SeaSucker Vacuum Mounts as it’s strong and durable. Furthermore, the roof section directly behind the windscreen is ideal for mounting SeaSucker Vacuum Mounts due to the fold or crease in the roof as it meets the windscreen. As a rule of thumb, the strongest part of the roof is predicated by the location of the folds or creases in the roof.

Back to the video. The Talon mainboard was installed with one vacuum mount on the windscreen and two vacuum mounts on the roof. The windscreen/roof mounting location provides a strong hard surface for the bike rack to attach to. If you’re looking for more examples of where to mount your SeaSucker Bike Rack then check out the appropriate links below relative to your vehicle type:
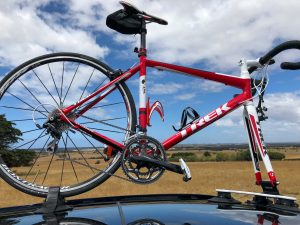
Talon 1-Bike Rack mounted on a sedan vehicles
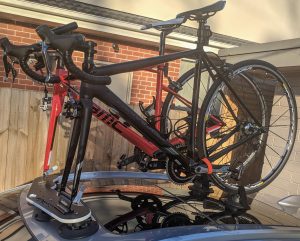
Talon 1-Bike Rack mounted on Sports Cars
Further links to follow
SeaSucker Bike Racks use Vacuum Mounts
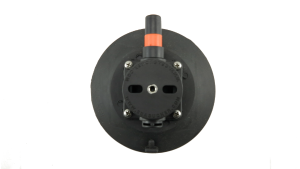
What’s the difference between suction cups and vacuum mounts? Whilst there are many, the key difference is vacuum mounts use an integrated pump. As a result, once the vacuum pad makes contact with the surface the pump is used to evacuate air trapped under the vacuum pad.

As shown in the above video, if you push the pump in then place your finger over the hole on the underside of the vacuum pad, the vacuum pump will remain depressed as long as you keep your finger over the hole. Subsequently, each vacuum mount must make complete contact with the surface in order to create a seal and for the pump to generate vacuum.
Each SeaSucker 152 mm Vacuum Mount has 90 kg direct pull-strength and has a safe carrying capacity of 32 kg. There are 4 Vacuum Mounts on the Talon 1-Bike Rack, 6 Vacuum Mounts on the Mini Bomber 2-Bike Rack and 8 Vacuum Mounts on the SeaSucker Bomber 3-Bike Rack.
Clean both surfaces prior to installation
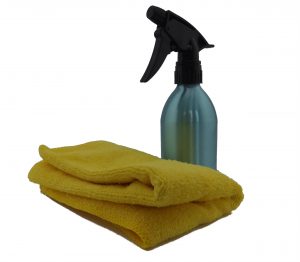
Cleaning Kit
With the location chosen, we can get on with how to install a SeaSucker bike rack. First, and foremost, you must clean both surfaces before installing the bike rack. This is hugely important. Each SeaSucker Vacuum Mount generates 90 kg (210 lbs) of direct pull-strenth. It is, for this reason, we supply our bike racks with cleaning kits. Only water is required for cleaning, no detergents necessary. Furthermore, by applying moisture to the vacuum mounts it prolongs holding time and helps create that perfect seal.
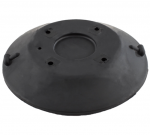
Remove the Protective Covers
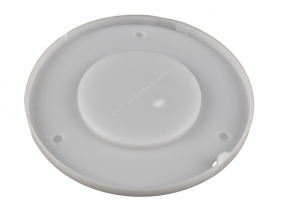
The protective cover performs two important functions. Firstly, it protects the vacuum pad when not in use. Secondly, it ensures the vacuum pad retains its correct shape between installations. When vacuum mounts are in use for many hours the vacuum pads become distorted, you could say it looks like it’s been squashed. This is due to the 90 kg of force being generated. To install a SeaSucker 152 mm Protective Cover place the cover over the pad. Next, push down on the vacuum pad to ensure it’s sitting inside the protective cover. Next, run your fingers around the vacuum pad pushing down on the vacuum pad until the pad is sitting completely inside the protective cover.
Push Down and Pump It!
Start with the bike rack main board as shown below. For the vacuum mounts to attach to the surface the vacuum pad must make complete contact with the surface. To do this, push down on each vacuum mount to ensure the vacuum pad is making complete contact with the surface. Whilst pushing down, commence pumping the vacuum pump. You will notice the vacuum pad compressing after a few pumps. Once this occurs, release the pressure and continue pumping it until the vacuum pump retracts fully.
Pro-Tip 1
To further strengthen the vacuum mounts holding power pull outwards on the pump quickly then give it a few more pumps until the orange indicator band disappears and the pump fully retracts. Repeat this a few times, this will strengthen the vacuum of your bike rack.
Remove the front wheel
Depending on your bike this procedure will vary, below is a brief overview:
- For Quick-Release front wheels, undo the quick-release skewer until the front wheel drops out from the forks. Consequently, a quick-release front wheel is also referred to as having “Drop Out” style forks. If you look closely at the forks you will notice a slot at the bottom of each fork
- For through-axle front-wheels, undo the through-axle skewer until it can be removed from the forks. At this point, the front wheel should drop out. If you look closely at the forks you will notice a hole at the bottom of each fork.
Position the bike and tighten the fork mount

Lift your bike and position it above the fork mount. To secure your bike by its forks please see below:
- For quick-release front wheels, the SeaSucker Talon has everything you need to transport a quick-release bike
- For through-axle front wheels, you will need the appropriate SeaSucker HUSKE plugs, this is available through our online store. If you have an older SeaSucker bike rack, for example, a pre-2019 model, you will need a fork mount adapter or a dedicated through-axle fork mount. For all through-axle bikes, the front wheel skewer is used to secure the forks into the fork mount. Begin by positioning the forks so that the hole in your forks lines up with the hole in the fork mount. Slide the skewer through the forks and the fork mount. Tighten the skewer until adequate pressure is attained.
Pro-Tip 2
For quick-release bikes set the lever to the horizontal position. Next, tighten the acorn nut then push the lever to the 12 o’clock position. You should be able to push the lever up with some effort but not to the point that it feels like you will damage your hand. If it’s too tight and you find it hard to move the lever to the locked position, back-off the acorn nut and try again. In the end, you are looking to replicate a similar level of force used when securing the front wheel to your bike.
Secure the back wheel
The back wheel is secured using the SeaSucker Rear Wheel Strap. Firstly, remove the protective cover from the rear wheel strap. Next, clean the area where the rear-wheel strap is to be mounted and the vacuum mount. It’s also a good idea to moisten the vacuum pad prior to installation. Position the rear wheel strap as close as you can to the back of the frame. Push down on the rear wheel strap and start pumping until the vacuum pump fully retracts. It’s also a good idea to also apply Pro Tip 1 to maximise the strength of the rear wheel strap.
Grab one of the Velcro strips and wrap it around your wheel. You will need to poke it through your back wheel so you can pull down to secure the back wheel by its rim. If the Velcro strap is excessively long you can either fold it in on itself or you can trim it. Having said this, if you have a mix of road and mountain bikes make sure you do this with the bike that has the largest rear tyre, which is typically a mountain bike. Next, grab the other piece of Velcro and repeat the same steps.
Secure the pedals cranks
Inside every SeaSucker bike rack is an orange double-sided Velcro. This is used to secure the pedal crank to the bike’s frame. Position the pedal cranks so they are aligned with the chainstay. Next, wrap the orange Velcro around the pedal cranks and the chainstay. This will ensure your pedal cranks can’t rotate whilst the bike is being transported.
This concludes our How to Install a SeaSucker Bike Rack article. You are now ready to transport your bike safely. We hope you found this guide on how to install a SeaSucker bike rack useful.